Wednesday, August 29, 2018

Best email app for iPhone in 2019


Best email app for iPhone in 2019


E-mail, like calendars, is something that is very personal. Over the years, email has morphed from a way to send electronic letters to turning into the digital hub of all we do online. Your Facebook account is tied to an email. Your Amazon account is tied to an email. Everything is tied to your email.

Email accounts are also difficult to change. Once you have it signed up with multiple services, moving from it is like moving your physical address. I’ve seen this first hand when folks leave the school I work at. I usually give them a few days to tie everything up, but many of them have used it as a personal account for years despite my warnings not to, so it becomes a difficult transition.

Like Calendar apps, there are many email apps for iPhone. I’ve tried and used just about all of them over the years. One of the questions people often ask me is: what’s your favorite email app for iPhone?You may also like:Gihosoft Mobile Transfer: 1 Click Data Transfer from Phone to Phone

I always say: it depends. I have my favorite, but it may not line up with the way you manage email. On the other hand, an app may have features you rely on that I don’t need. I’m going to show you each app, and I’ll give you my pick at the end. If you don’t agree – that is perfectly okay. Let me know what you think in the comments.

One thing to keep in mind, I am looking at iPhone only. Some apps work better if you use their macOS counterpart, but I am just looking at the iPhone experience.
Apple Mail
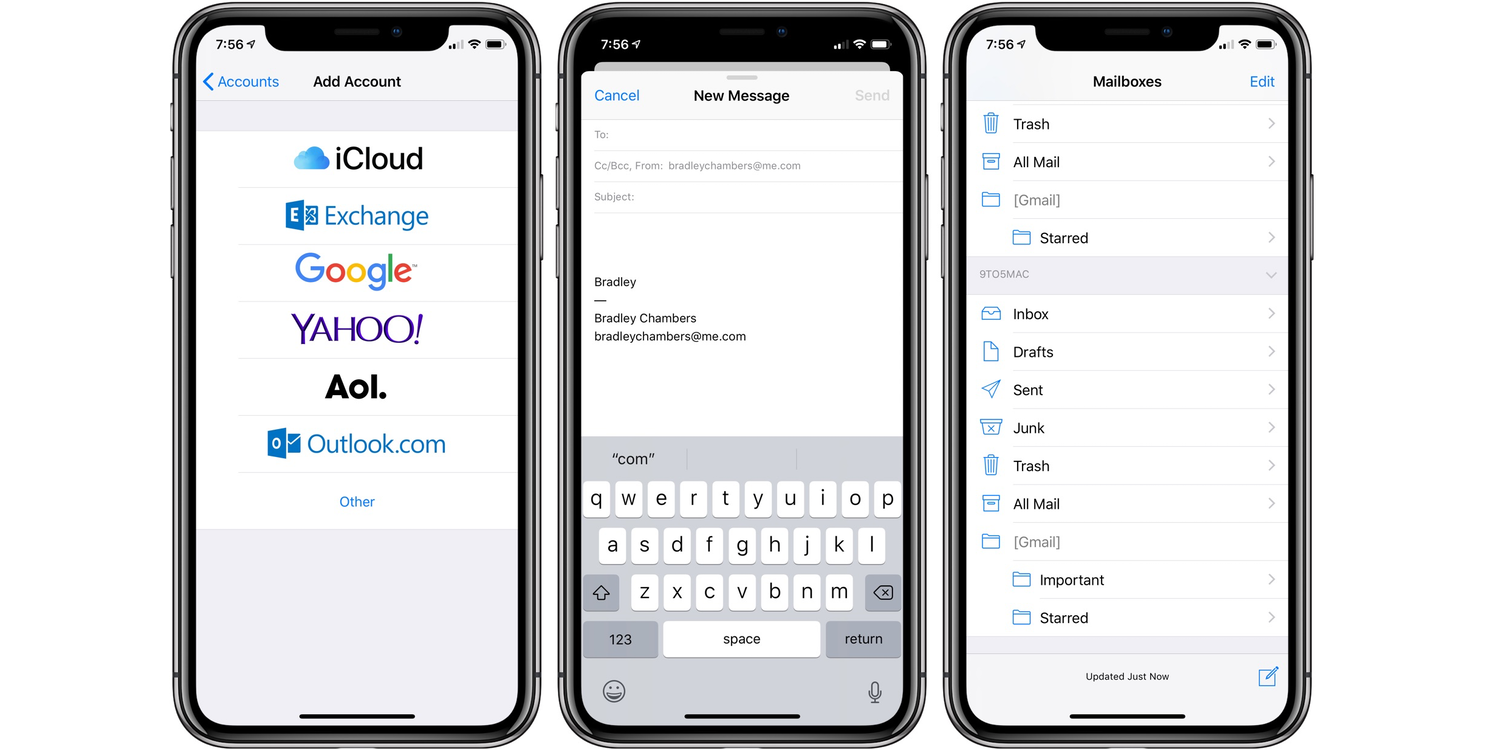


I’d dare to say that the Apple Mail email app is one of the most used email apps in the world today. It comes built into every iPhone, and it supports just about any account type you’d like. It’s easy to start new messages. It’s fast to do tasks like archive, delete, move to folders, etc. It’s easy to add attachments/photos to email. As far as traditional email clients go, it’s about the best you could ask for.

My concern is that a lot of other apps are innovating with email. Apple’s app covers the “stock” experience (sending, reading, etc.) very well, but it lacks snooze, quick replies, and other features that should be added. A few weeks ago, I wrote an article about four features I’d love to see come to Apple’s mail app. That list came out of this article. I won’t repeat those here, but I would go read it. Apple Mail works great, but a lot of apps are rethinking email where Apple is settling for the standard-quo. I know it’s difficult to innovate when a lot of users want the basic experience, but it’s long past time for Apple to add power user features to Apple Mail on iOS (and macOS).
Outlook – Free
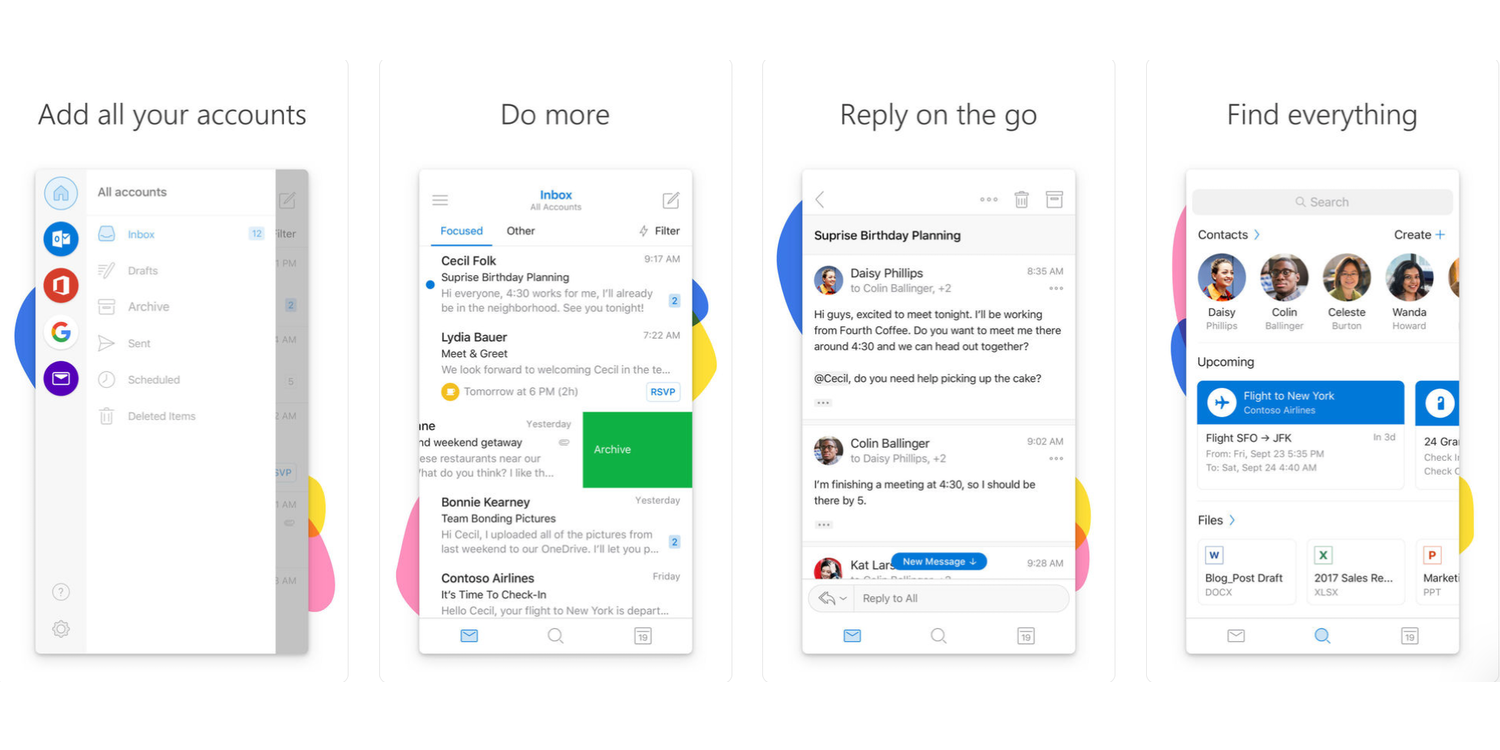


If you are used to Outlook on PC or Mac, you’ll be surprised how much different Outlook on iOS is when you first launch it. It’s not the traditional Outlook, but a reimagining of what it should be. Microsoft bought Acompli back in 2014, and launched the original version in 2015. They’ve kept enhancing it since then.

If you want to find an app that feels like Apple Mail+, Outlook is it. It includes a smart inbox (sort between important emails and non-important ones). It contains customizable swipes (delete, archive, etc). You can also schedule messages to show back up in your inbox. This feature is useful if you want to make an email disappear until you are back at work, etc.

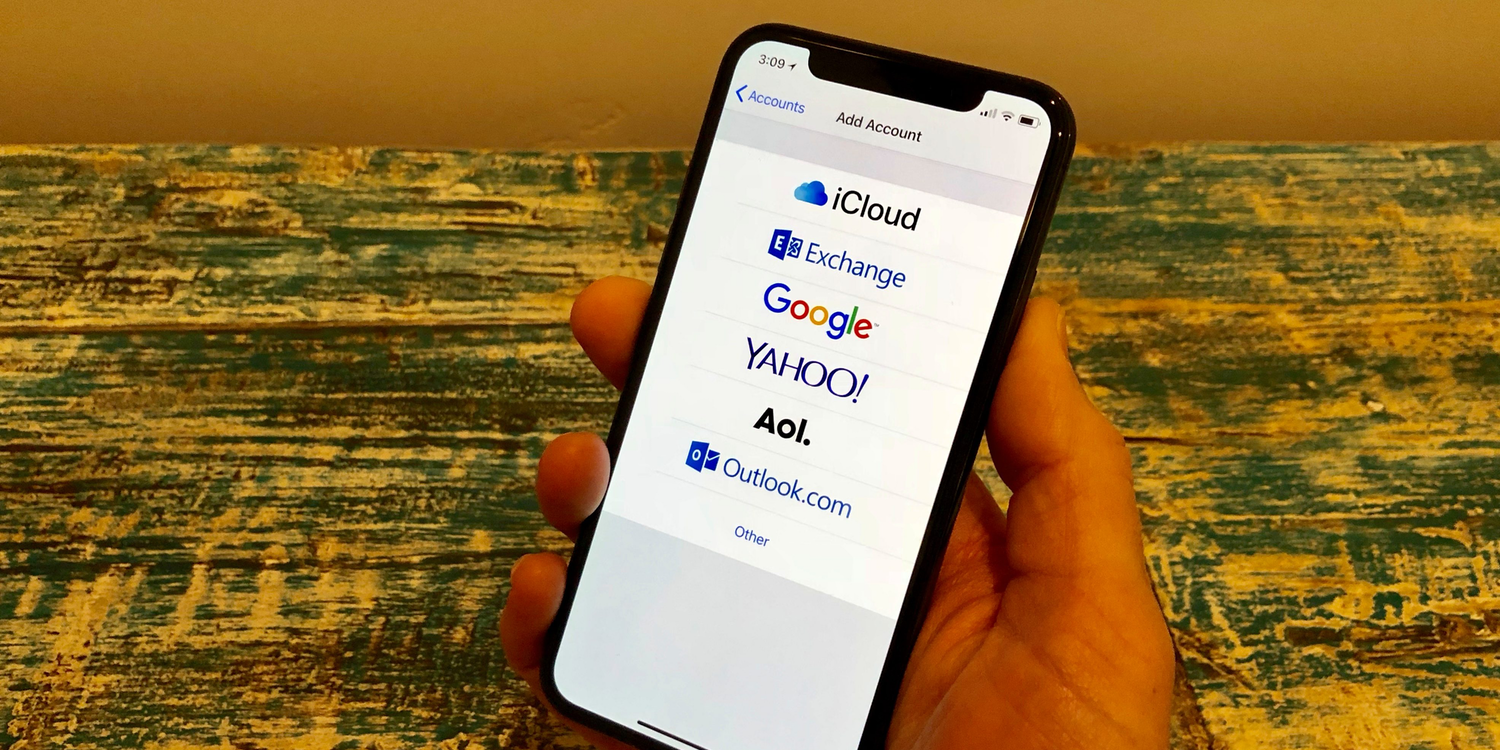
It includes a built-in Calendar (negating the need for a separate calendar app) that can pull in iCloud, Google, Exchange, Outlook, and Yahoo calendars. Because it integrates everything into a single app, you can easily share availability for meetings right inside the app.

It also can work with third-party apps such as Google Drive, Dropbox, Evernote, Trello, and more.

Overall, Outlook is awesome. It’s free, works with all the major accounts you’ll have, and provides a lot of great features.
Airmail – $4.99
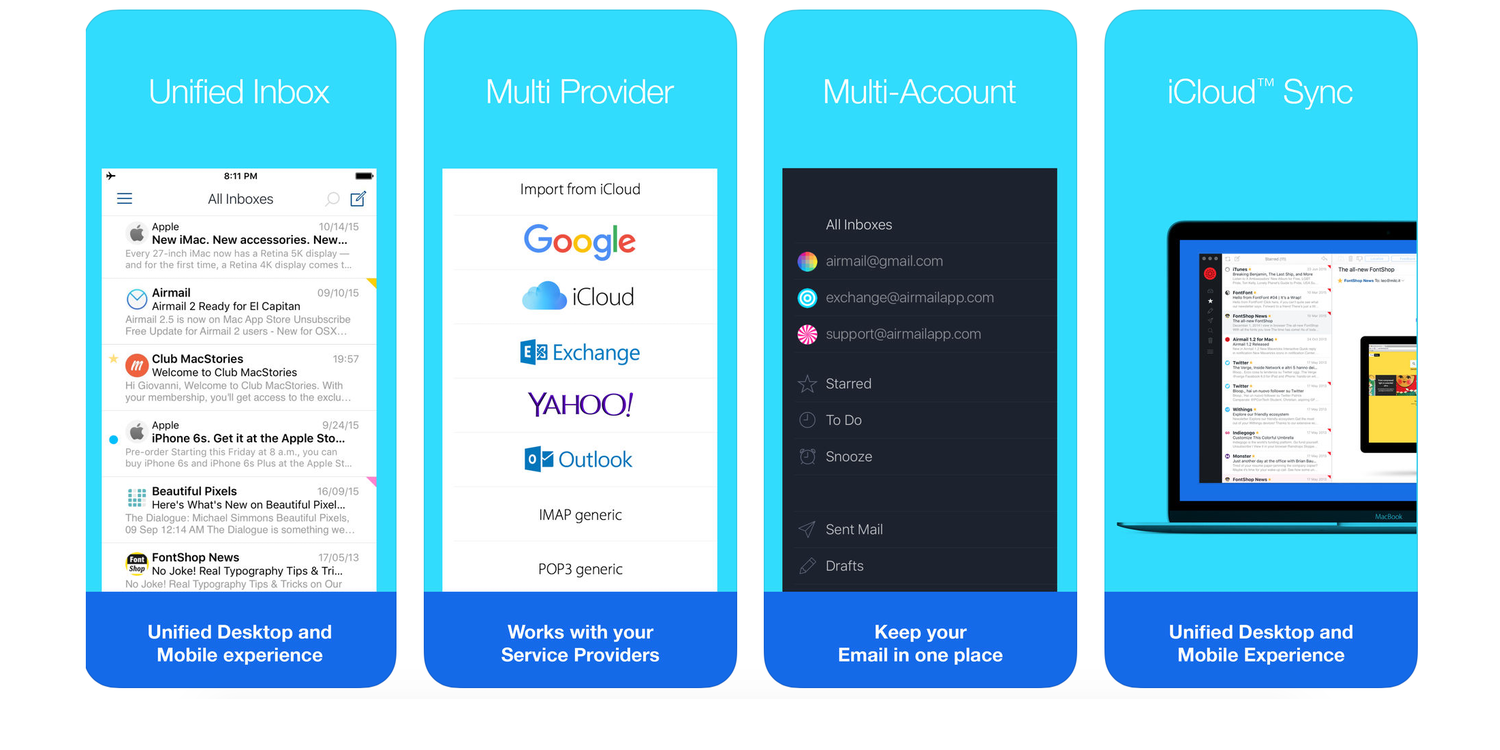


Airmail has been around for many years, and it’s one of the most common third-party mail apps that people mention. Airmail supports all the major email accounts like iCloud, Exchange, Outlook, Google, Yahoo, IMAP, etc. I originally tried Airmail when it was first released, and it has seen a constant stream of updates since then.

Airmail features an extensive list of apps to integrate with. The list includes Google Drive, Dropbox, OneDrive, Box, Trello, Asana, Omnifocus, Google Tasks, Evernote, Todoist, Drafts, Deliveries, Things, Calendar 5, and many more. Like Outlook, Airmail supports snoozing an email to another date/time. You can create a PDF from an email, mute/block senders, or create a to-do (Airmail offers a lightweight to-do list built in). The action list of items you can take on a message is long.

Design wise, Airmail has done a great job of staying with iOS design trends while having its unique style. It stands out from any other app you’ll use, and it’s overall pleasant to look at.

The last thing I want to say about Airmail is almost everything is customizable. If you want an email app with a lot of knobs to tinker with, Airmail is going to fit in with your workflows.
Spark – Free
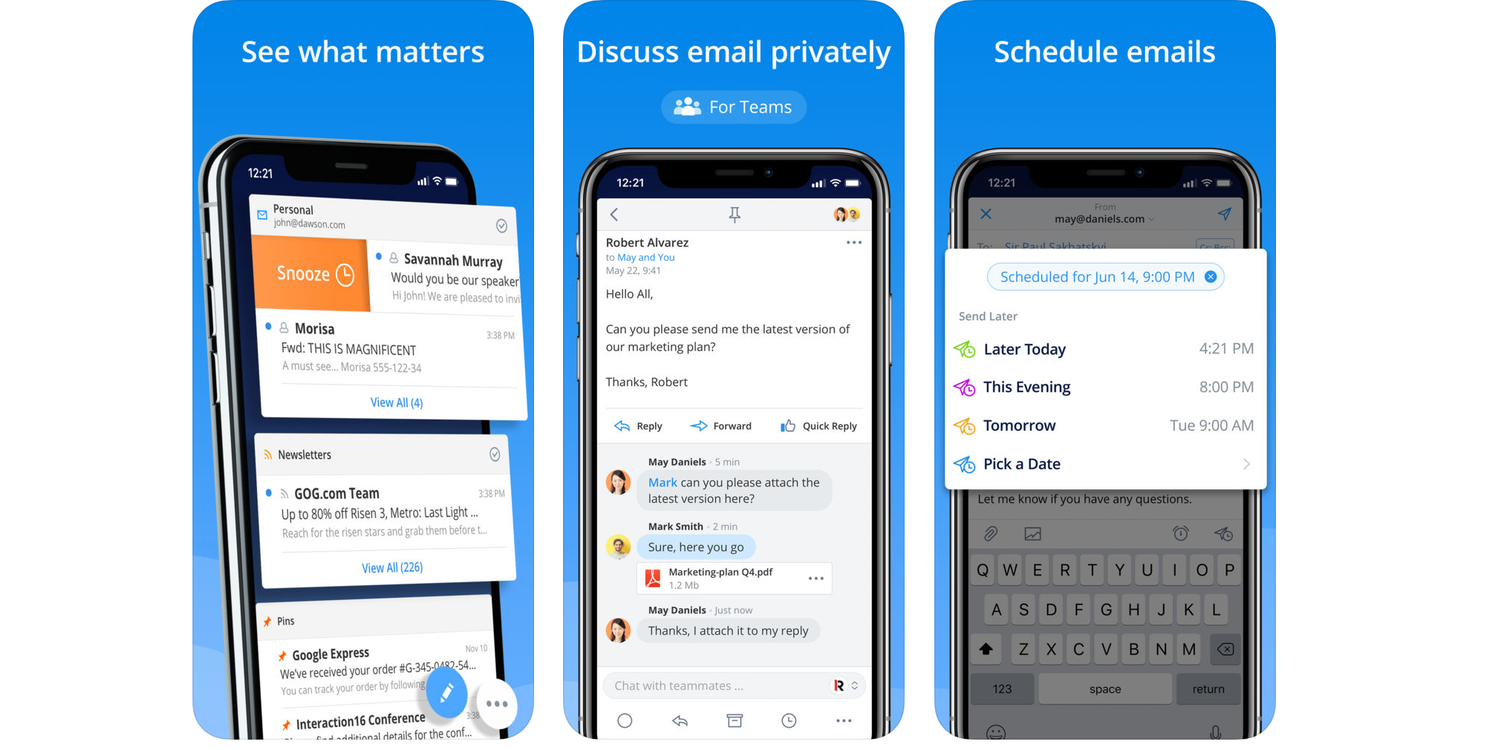


Spark is one of the newcomers to the third party email app market, but it has had constant enhancements since it was released. Their tagline is “Love your email again,” and it certainly does a great job of helping you take control of your inbox. It supports all the usual accounts like iCloud, Google, Yahoo, Exchange, Outlook, and IMAP.

Feature-wise, Spark includes a smart inbox to help organize your email into buckets like newsletters, pinned, new, seen, etc. It also includes the ability to snooze emails, send later, email follow up reminders, smart notifications, and tons of integrations with third-party apps (Dropbox, Google Drive, One Drive, etc.). You can also personalize the app to your heart’s content. Do you want a right swipe to delete and a left swipe to be pin? You can do that. Do you want a calendar button at the bottom? You can add that.

When Spark was initially released, I worried about the longevity of it due to the fact is was free. Over the years, we’ve seen many email apps released and be discontinued later, so I am always curious about the business model of the various apps. Spark now has a teams plan that answers that question for me. By signing your organization up, you can collaborate on emails together, talk about replies privately (without having to forward things back and forth), and create permanent links to email messages (helpful for linking to a CRM, etc.). A basic version of Spark for Teams is free, but they have paid versions (monthly per-user fee) with extra file storage, enhanced link sharing, and team roles and control.
Dispatch – $6.99

Dispatch has been around for many years. Its primary goal is to help you process your email quickly by deciding to delete, defer, delegate, generate actions, or reply with ease. It supports a number of third-party integration, and it has a beautiful design overall. Its major problems is that it lacks Exchange support or true push notifications.
Edison Mail – Free

Edison Mail is a great email app for the iPhone. One of the features I’ll praise is how fast it is. It includes an Assistant feature to help you organize your mail automatically.

Get organized with categories. The app’s assistant will automatically categorize messages for you to make them easier to find. Like peanut butter and jelly, some things go together.

Overall, it’s a fine app, but it doesn’t do anything to stand out among some of the other apps. It has your basic power user features like snoozing and customizable swipe options. It does include the ability to set an Undo Time Window (3–15 seconds), so you can quickly get your emails back if you regret them. It supports all the usual accounts like iCloud, Google, Yahoo, Exchange, Outlook, and IMAP.

One reason I am hesitant to use Edison Mail is that it’s free. I’d love to know more about their long term business plans.
Astro – Free

Astro is an enjoyable app to use, as it includes an AI assistant to help you handle your email faster. It includes a send later feature, reply tracking, open tracking, undo send, and important email reminders. Some of its unique features are how it helps you stay on track of your email. It can identify time-sensitive requests or due dates and help you follow up. It can also remind of you questions that are in your email. You can also integrate Astro in with Slack.

One of the significant downsides is that it only supports Google and Office 365 accounts at the moment. If you use those services, I would recommend you check it out.
Wrap Up

I’ve spent time with almost every email app I could find. Email is highly personal, and my preferences won’t match yours. I also haven’t considered various security protocols like PGP integration.

At the end of all my trials, I’ve come up with these recommendations: If you like the experience of Apple Mail, but want some additional features, Check out Outlook.

If you want a rethinking of the email experience, check out Spark. Spark’s team features are great for people with corporate accounts, and it’s great to see innovation still happening in email.

If you lost important notes on iPhone or iPad, check out Gihosoft iPhone Data Recovery. Gihosoft Studio is a professional team on data recovery for iOS devices. Also you can use it to recover deleted contacts, messages, photos and so on even without backup.

What do you think? Did I miss anything? Let me know in the comments.


Free iTunes/iPhone Backup Extractor for iPhone, iPad

Jihosoft iPhone Backup Extractor is a powerful tool to recover and extract important data from iPhone, iPad & iPod touch backup on Windows or Mac.

Related readings:


Best iOS Mirror Apps to Wireless Stream Your iPhone/iPad Display


Best Free Video Downloader Apps for iPhone/iPad in 2018


Top 10 Video Editor Apps For iPhone or iPad 2018


7 Little Tricks to Speed up iOS (Also Work with iOS 12)

7 Little Tricks to Speed up iOS (Also Work with iOS 12)


Trick 1. Turn off auto-updates: This auto-updating feature will make your apps stay up to date with many new features and less bugs. Usually app size varies from dozens of MBs to a hundred GBs, and updating these apps in the background will surely occupy much more RAM thus dragging down your iPhone speed, especially when a bigger iOS 12 is running.


Trick 2. Deactivate motion effects: The screen motion effects are not essential in improving user experience, as opposed to a slower responsive speed. You can check Reduce Motion option and inactivate this feature to make iOS 12 faster.


Trick 3. Clearing up running apps frequently: When you switch from one app to another, you think the app is closed. However, they are still running in the background for instant access. Too many apps running at the same time can make iPhone iOS 12 perform badly.


Trick 4. Reset Network Settings to Fix iOS 12 Slow InternetResetting your network settings can boost your internet’s speed to some extent. You can reset your network settings by going to Settings -> General -> Reset -> Reset Networking Settings. Tap confirm.


You may also like:Gihosoft iPhone Data Recovery


Must Read:Gihosoft Free Android Data Recovery


Must Read:Jihosoft iTunes Backup Unlocker


Jihosoft iTunes Backup Extractor free is a powerful tool to recover and extract important data from iPhone, iPad & iPod touch backup on Windows or Mac.


You may also like:

Gihosoft Total Video Converter is a professional all-in-one video tool that enables you to convert videos and audios into various different formats.

You may also like:online youtube downloader

Trick 5. Manage iOS 12 animation related issues iOS 12 has certainly got a number of different features in terms of animation. This makes the iOS run slower than usual. However, there is an easy to way to get yourself through this problem as well.

All you need to do is go to Settings -> General -> Accessibility -> Reduce Motion -> Turn on.

Trick 6. Optimizing iMessage to allow more efficient use of iPhone’s resources iMessage has a lot of new features such as upgraded stickers and emojis that can eat up most of your phone’s memory. You can adjust the usage through Settings as well.

Go to Settings -> Messages -> Low Quality Image Mode -> Turn on the Low Quality Image Mode.


Trick 7. Decrease the number of widgets on your home screen. iOS 12 has got a great deal of widgets with amazing features. However, having a lot of such widgets on the home screen can give your phone a hard time in terms of performance.

Therefore, remove the ones that you do not need much and only keep those that are necessary.
For all those methods above, of course, using a software should be more effective and that's the most simple way. More or less, other methods have some disadvantages. Save space and improve performance by compressing photos losslessly rather than restricting iPhones beauty and needlessly clearing apps all the time. With Umate, just one click does the trick.

Monday, August 27, 2018

Best Bitcoin Wallet Apps for iPhone and iPad 2019


Best Bitcoin Wallet Apps for iPhone and iPad

Wow, the best iPhone Bitcoin Wallet Apps. The Cryptocurrency, this word has attracted a lot of people towards it and still gaining attention. The trend of digital payments is enormously increasing day by day and peoples are also taking an interest in it. It is a bit difficult to mine bitcoin but to purchase a bitcoin with your traditional currency; it is very simple.

Once you have purchased a bitcoin, the first question will arise in your mind will be “which is the best application for my iOS to store bitcoin securely?”, because when you want to do a transaction with bitcoins, at that moment, the application should maintain consistency and security. Otherwise, there may be situations arises that someone stole your coin.Must Read:icloud lock tool


So here I am suggesting some of the finest apps for your iOS devices for better and safe transaction of bitcoins.
The Top 6 Best Bitcoin Wallet Apps for iPhone and iPad


#1. Blockchain-Bitcoin Wallet

The blockchain bitcoin wallet is the much popular digital wallet for storing bitcoins and for the transaction of bitcoins safely with anyone in the world. Creating a new wallet or access the old one is a very simple process in any iDevice and it can be done in seconds, and it is free. Any queries regarding anything you just have to tap into help center and they will solve your problem. – Supported by iOS 9 or later devices.
#2. CoinBase BitCoin Wallet

Coinbase is used to store bitcoins, litecoins, and ethereum, it is the first ever app which can store three different cryptocurrencies. You can make transactions with different cryptocurrencies like bitcoins, litecoins, and ethereum. Instantly purchase and sell litecoins, bitcoins or ethereum using credit cards, Paypal or debit cards. (Supported by iOS 10 or later)
#3. Copay BitCoin Wallet

The thing that differs Copay from other apps is multisignature wallet from Bitpay. Multi-signature wallet requires multi approvals to make any transactions, and that’s the reason which makes this app more defended against unauthorized activities. It allows us to control bitcoin wallets by different private keys and users. App for iOS 9 or later devices.
#4. Bread – Bitcoin Wallet

BreadWallet is quite simple to use even fresher’s can easily operate this app. If you had recently purchased bitcoin and you are not much aware of bitcoin apps and how it works then BreadWallet is perfect for you. Even when you need any help or if you have a query regarding app then the help center is always ready for you, just you need to tap once. The Bread Wallet is not only for iOS, but it is also supported by Apple Watch (WatchOS). Compatible with iOS 9.3 or later devices.
#5. Mycelium Bitcoin Wallet

The basic function of the Mycelium Bitcoin wallet is to receive or send bitcoins and complete your transactions with your finger-tips. This app is highly isolated which never let your private keys to leave your device unless you do. Rapidly gets connected to the bitcoin network and gives updates every moment. Top for iOS 8 and later for iPhone iPad and iPod touch.
#6. Airbitz Bitcoin Wallet

Every bitcoin app mainly focuses on selling, receiving or sending of bitcoins. But Airbitz is designed for maintaining your transactions and bitcoins isolated. The advantage of using Airbitz is it can prevent bitcoins from the 3rd party and also the Airbitz itself is not aware of your account. With the ease of mobile banking operate your bitcoins instantly within seconds. not for iOS 8 users cause App is compatible with iOS 9 or above iPhone and iPad.

You should also see post related Apps like given below:


Top 10 Video Editor Apps For iPhone or iPad 2018


4 Tips to Fix Unable to Install iOS 12 Update


How to Unlock a Disabled iPhone Without iTunes


Free iTunes/iPhone Backup Extractor for iPhone, iPad

Jihosoft iPhone Backup Extractor is a powerful tool to recover and extract important data from iPhone, iPad & iPod touch backup on Windows or Mac.

Sunday, August 26, 2018

How to Fix for “The iPad Cannot Be Synced. An Internal Device Error Occurred ”

How to Fix for “The iPad Cannot Be Synced. An Internal Device Error Occurred ”
1. Update iTunes to the Latest Version

Running an older iTunes' version can be the reason why your iPad cannot be synced. In order to avoid that internal device error, you need to install the latest iTunes version. And for the steps, you need to scroll down a little.

For Mac:


Choose 'iTunes' option from the menu post opening iTunes.


Choose 'Check for Updates' and you will be notified whether you have an update or not.


If there is availability, follow the prompts and install the latest version.


For Windows:


Launch iTunes and go to the 'Help' option.


To know about the updates, go to 'Check for Updates'.


Lastly, click on 'Install' to get the newest iTunes version in your PC.


2. Reinstall iTunes

Many times, removing iTunes and the installing it again works when syncing issue emerges with iOS devices. So, in the case of iPad not syncing too, you need to try uninstalling and re-installing iTunes. Read out the steps meticulously to get the process done.


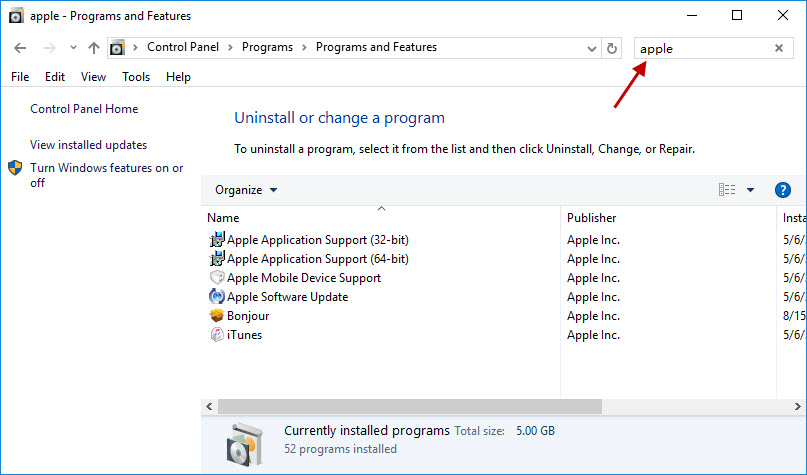
First of all, begin to remove all software related components by using 'Control Panel'. Make sure to remove them in the same order as mentioned below.


iTunes


Apple Software Update


Apple Mobile Device Support


Bonjour


Apple Application Support 32-bit


Apple Application Support 64-bit

Sometimes some systems get two iTunes version of iTunes. Ensure if you have both versions and uninstall both.

After doing this, uninstalling process will be completed. Now, restart your computer and go for the re-installation of the iTunes process.


3. Force Restart iPad

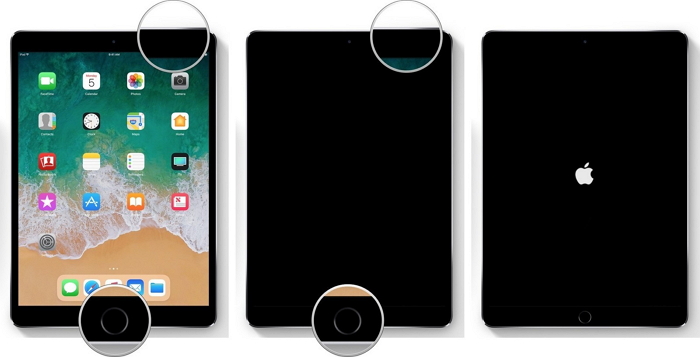
Whenever an internal device error occurred and iPad cannot be synced due to that, try force restarting your iPad. This can fix the issue. Here are the steps to do this.

Jihosoft Giveaway Alert:

iPhone Backup Extractor - Extract Data from iPhone Backup

The best iPhone Backup Extractor Free software to extract photos, text messages, contacts, voice memos, note, WhatsApp, Viber and etc from iPhone/iPad backup.

You may also like:Gihosoft iPhone Data Recovery

Must Read:Jihosoft iTunes Backup Unlocker


Begin with pushing the 'Sleep/Wake' button along with ''Home' button.


Keep holding the buttons for roughly 10 seconds.


Release the buttons at the moment you see the Apple logo on the screen.


4. Use Another Computer to Sync iPad

Sometimes, when there is a syncing problem with iPad, chances are that iTunes are not supported to your system or maybe there is any technical issue with the system. Also, perhaps the USB port of the computer you use is not fine and giving you the problem. That's why, we would suggest you to try connecting your iPad with another computer and check if the problem disappears or not. If still your iPad is not syncing, jump down to the next fix.
5. Restore with iTunes using Recovery Mode

A yet another solution that can help you when the iPad cannot be synced is restoring your iPad with iTunes after putting it in recovery mode. Here are the moves that you should take for restoring.


Firstly, open iTunes and connect your iPad with your PC.


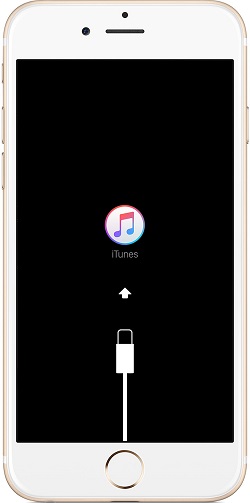
Now, follow the steps of 'force restart' and you will get the recovery mode screen at the end.


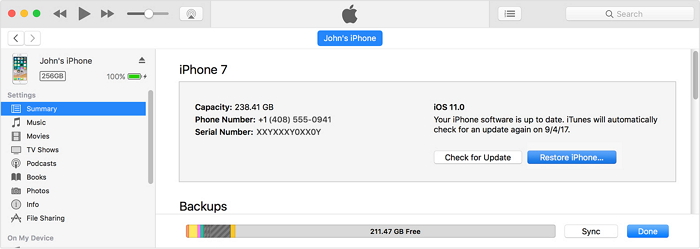
This will be recognized by iTunes and it will give you a window withsome options. Click on 'Restore iPad' and your device will be out of trouble. Please note that this method will remove all your data so ensure to make backup of your device.


Must Read:tumblr video downloader

Must Read:Jihosoft iTunes Backup Unlocker

You may also like:online youtube downloader


Thursday, August 23, 2018

If iTunes Doesn’t Recognize the Disabled/Locked iPhone,How to Fix ?


If iTunes Doesn’t Recognize the Disabled/Locked iPhone

If iTunes doesn’t recognize the device, the following are just some of the options you can try;

If the screen is broken, fix it and then backup the device when you can enter the passcode.

You can also use a Bluetooth keyboard to enter the password although this keyboard needs to already be paired with the device for this method to work.

If a small section of the screen is still working, you can enable voice over mode and use it; Here’s how;

Step 1: Hold the home key to turn on Siri and ask Siri to turn on Voice Over.

Step 2: Swipe right or left until “Slide to Unlock” is selected.

Step 3: Double-tap to bring up the passcode page and the swipe right/left to enter the passcode. You can enter the passcode by double-tapping each number.
Part 3: How to Remove Password if iPhone is Disabled

If you have forgotten your passcode, you may need to erase the device to remove your current passcode and set up a new one. You can do that in iTunes or using recovery mode.
1. Remove Passcode with iTunes

Follow these simple steps to remove the passcode on the device using iTunes;

Step 1: Connect the iPhone to a computer you’ve synced the device with before.

Step 2: Open iTunes and when asked for a passcode, use another trusted computer or use recovery mode.

Step 3: If you are not asked for a passcode, wait for iTunes to sync your device and make a backup.

Step 4: Once the backup is complete, click “Restore iPhone” and in the set-up screen, choose “Restore from iTunes” backup.

Step 5: Choose the most relevant iTunes backup by date and size and wait for the process to be completed.


2. Remove Password with Recovery Mode

If you have never synced your device with iTunes, you may need to use recovery mode to erase the device and its passcode. Follow these simple steps to do that;

Step 1: Connect the iPhone to the computer and then open iTunes.

Step 2: Once the device is connected, you need to force-restart it. Here’s how to do that for different devices;

For iPhone X, iPhone 8 and iPhone 8 Plus: press and quickly release the Volume up button. Press and quickly release the Volume down button and then press and hold the Side button until you see the recovery screen.

For iPhone 7 or iPhone 7 Plus: Press and hold the Side and Volume Down buttons at the same time until you see the recovery mode screen.

For iPhone 6s and earlier: Press and hold both the Home and Top or Side buttons at the same time until you see the recovery-mode screen.

Step 3: With the recovery mode on the screen, you should see the option to “Restore” or “Update” in iTunes. Click “Restore” and iTunes will download software to your device.

Step 4: Wait for the process to finish and then set-up the device as normal.


Jihosoft Android Data Recovery: the best Android Data Recovery software for Windows and Mac to recover deleted contacts, messages, photos, videos, WhatsApp and etc from Android devices.

Gihosoft Android data recovery Free is a super awesome software specialized in Android file recovery. With this program, you are able to recover deleted photos, music, videos, messages, contacts, call logs, WhatsApp messages, Viber chat history and more from Samsung, Huawei, LG, HTC, Motorola, Google, Oneplus, Sony, Lenovo, ZTE and other Android devices directly. Meanwhile, this Android data recovery software is available for both Windows and Mac platforms.
For now, check:Free iTunes/iPhone Backup Extractor for iPhone, iPad

Jihosoft iTunes Backup Extractor free is a powerful tool to recover and extract important data from iPhone, iPad & iPod touch backup on Windows or Mac.

If you can’t sync with iTunes and want to rescue data from a disable iPhone, you could try Gihosoft iPhone Data Recovery. Also feel free to ask questions on the iDevice is disabled error in the comments section below.

Wednesday, August 22, 2018

How to Use Face ID on Any iPhone


How to Use Face ID on Any iPhone


Face ID is an innovative feature that uses face detection mechanism to allow users to unlock their iPhone. It was first introduced in iPhone X to replace the old Touch ID unlock mechanism. As you might know, Face ID is available in iPhone X only so if you own an older iPhone model, then you won’t be able to take advantage of this new feature.

Luckily, there’s now a new method that allows you to use Face ID on any iPhone, thanks to a new jailbreak app called Appellancy that mimics the functionality of Face ID on older iPhone models. Using this app, you can unlock your iPhone using your face just like how Face ID works.

In this tutorial, we’ll show you how to install and use Appellancy on any jailbroken iPhone running iOS 11.You may also like:online youtube downloader

Read also: How to Unlock a Disabled iPhone Without iTunes

How to Use Face ID on Any iPhone

Step 1: Open Cydia, then go to the Sources tab and add the following new repository: http://julioverne.github.io

Step 2: Once the new source has been added and all its packages loaded, search for the tweak Appellancy and install it.

Step 3: Go to the Home screen and open the app. Tap on the + button in top right corner to add a new user, then open it. Here you can take pictures of your face so that the app recognizes you when you attempt to unlock your iPhone.

The more pictures you take, the better the face detection functionality. For instance, you can capture a picture from every angle of your face. Apart from your own face, you can also add other people’s face to the app so that your device can be unlocked with their face as well.

Step 4: Now you’re ready to go. Whenever you want to unlock your iPhone using your face, simply hold it in front of you so that the front camera can detect your face. Within a second, your device will automagically get unlocked just like Face ID.

That’s all you need to do to get Face ID on any iPhone. It’s important to note that this app just mimics the functionality of Face ID and doesn’t actually enable the original Face ID feature built by Apple. It is nowhere as secure as Face ID and I wouldn’t recommend anyone to use this app for unlocking their iPhone as Touch ID and passcode are much more secure. Instead, this jailbreak app should just be used for fun purposes when you want to show your friends that your device has face unlock mechanism as well.

It’s very interesting to see the creativeness of jailbreak developers in bringing new iOS features to older iPhone models that don’t support them.


Note: you must jailbreak your iPhone to use this trick.


If you lost data after jailbreak, you may use Gihosoft iPhone Data Recovery to get back your lost iPhone data, which is a powerful recovery tool to help you retrieve various data like messages, contacts, voicemails, notes, photos, etc.


Free iTunes/iPhone Backup Extractor for iPhone, iPad

Jihosoft iTunes Backup Extractor is a powerful tool to recover and extract important data from iPhone, iPad & iPod touch backup on Windows or Mac.

You may also like:


4 Tips to Fix Unable to Install iOS 12 Update


How to Recover Data from iPhone/iPad after iOS 11/12 Update

Saturday, August 18, 2018

How to Add Ringtones to iPhone on Old iTunes

How to Add Ringtones to iPhone on Old iTunes

It is a little bit more cumbersome, but you are able to add music from iTunes to your phone as a ringtone. Try it once and you’ll see why iMyFone TunesMate is an easy choice.sync ringtones

Since the latest iTunes has removed the Tones tab, this method is only for iTunes which is before version 12.7.

Tones tab disappears on iTunes 12.7? How to Transfer Ringtones Using iTunes >>


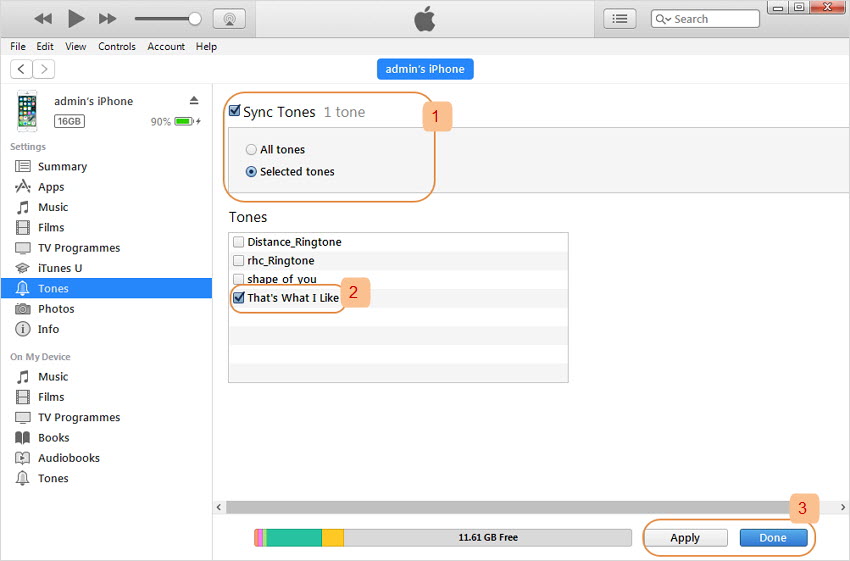
Step 1. Plug your iPhone into your computer. Open iTunes on your computer.

Step 2. If the ringtone is not in your iTunes library, drag your desired m4r files into iTunes to add them to your library.

Step 3. Within iTunes, click on your device and then choose Tones from the menu on the left.You may also like:online youtube downloader

Step 4. Check the box labeled Sync Tones.You may also like:online youtube downloader

Step 5. Choose All Tones or Selected Tones according to your preference.

Step 6. After you have selected the appropriate ringtones, click Apply and the tones will be synced to your iPhone.

Disadvantages:


You can't put the ringtones directly from computer to iPhone wihout going through iTunes library.

For now, check:Free iTunes/iPhone Backup Extractor for iPhone, iPad

Jihosoft iTunes Backup Extractor is a powerful tool to recover and extract important data from iPhone, iPad & iPod touch backup on Windows or Mac.

Syncing iTunes files to iPhone will delete the existing files from iPhone as well.
How to Download Purchased Ringtones on iPhone

An easy way to add new ringtones to your iPhone is by doing it straight through your phone’s settings or the ToneStore. The two main problems with this method are that (1) ringtones cost about the same amount as a full song and (2) you are limited to tones available through iTunes.

For now, check:Free iTunes/iPhone Backup Extractor for iPhone, iPad

Jihosoft iTunes Backup Extractor is a powerful tool to recover and extract important data from iPhone, iPad & iPod touch backup on Windows or Mac.
If you are alright with those drawbacks, then here are the steps to follow:
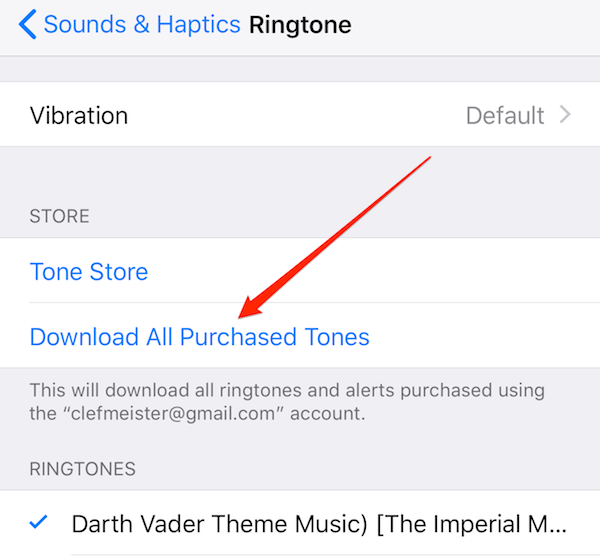
download purchased ringtones


Step 1. Open the Settings on your iPhone.

Step 2. Scroll down until you find Sounds and tap on it.

Step 3. Select Ringtone.

Step 4. Tap on Download All Purchased Ringtones to add any ringtones you may have previously purchased from your current Apple ID.

Step 5. Optional: To purchase new ringtones, tap on Tone Store to go to a special section of the iTunes Store devoted just to ringtones.

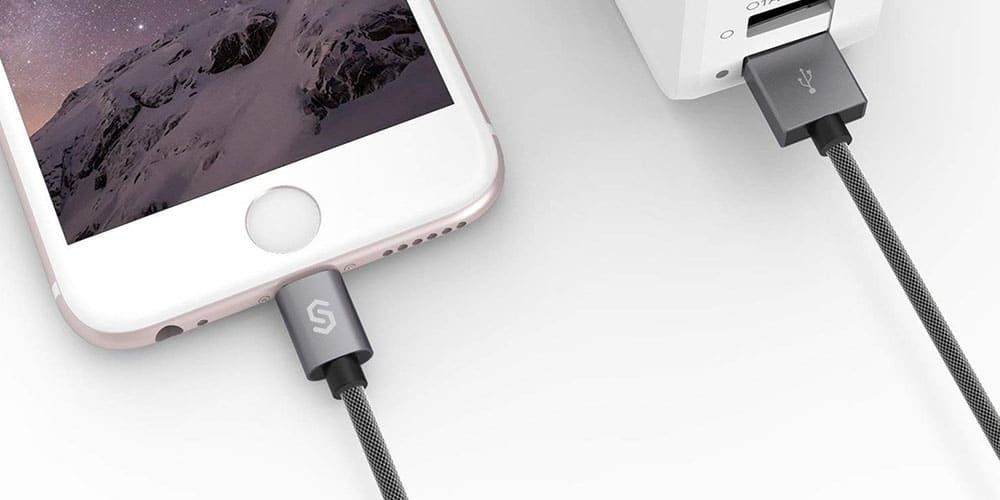
Find Your Next Dependable Charging Cord Here [Deals Hub]

There’s no such thing as too many charging cables. Fortunately, these days there are plenty of options when it comes to color and length. We...